
I’m a farmer myself, one who uses nothing but electric fencing to contain everything from chickens to dogs to cattle. I’m going to explain effective methods, go over specific needs, and talk about unique challenges while helping you build the right fence for your goats.
There are many benefits of keeping goats around your homestead, including their spirited and loving nature. Goats also share a characteristic that often comes as a hassle: their curiosity. The constant pursuit of this curiosity makes our goats great escape artists, seeking the “greener side” outside of their physical barrier. The best way to keep these masterminds within these boundaries is proper goat fencing that makes escaping impossible––with a sturdy and reliable electric fence.

When built properly, electric fencing can be very beneficial for containing goats. It creates a barrier that is strong and inescapable. Knowing what types of fencing there are, the materials needed, and how to construct the fence are steps in this process of creating a better physical, as well as psychological, barrier for your goats.
There are different fencing options you can look into having for your land. The first question is “does this need to be temporary or permanent?”. When looking at types of fencing, there are temporary fences, semi-permanent, and permanent fence. The best type of electric fence overall depends on your preference and what you think is best electric fence for your goats. We typically put forth a better effort when we’re building something we believe.
Temporary fencing can be moved around frequently, between a daily to weekly timeline, and typically consists of electric netting or the use of polywire reels. Ready-to-use kits can also be purchased for a reasonable price. Overall, these can be useful for fast-paced rotational grazing set-ups, or other situations when you need to move the fence or your goats frequently.

Semi-permanent fencing is moved less often, from a monthly move even up to a yearly move, and typically consists of taller and thicker posts with more conductors. This would be a stronger, more reliable option, but not as efficient as permanent fencing. These may include 3-5 strand electrified fences, but it’s also important to consider that these lack vertical strands, which increase visibility and acts as a better psychological barrier to goats. You would also need stronger end and corner posts since strands are tensioned. We’ll talk more about ends and corners shortly.
Finally, we have permanent fencing, which should be the strongest and most durable of the options and requires no movement. This may cost more, but the overall results prove its worth. This fencing needs stronger wood or steel posts that can support high-tensile wires, woven wire fence, rope or wide tape. It can also be an option to add electrified wires (this can be a “live” strand of rope, or a specific brand of wire like MaxiShock) to existing fencing. In this case, strands would be supported by insulators that hold them 6-8 inches away from the existing fence.

As previously stated, the best option for you will depends on personal preference, type of terrain, and the behavior of your goats. Different options work better for everyone; however, the durability and strength of permanent electric fencing often proves to be the superior electric fence system. These tend to be most effective in keeping goats contained, but it’s ultimately up to you to decide which type of fence is best for your operation.
Once you have determined which type benefits you most, it’s time to gather the materials needed for constructing your fence. The following list is compiled of items that will be useful in building your effective electric fence:
infographic with these items
- T-Posts
- T-Post insulators
- Galvanized Steel Wire (high tensile wire)
- Aluminum Wire (if preferred over galvanized steel)
- Concrete mix (optional)
- Corner Posts
- Corner Post Insulators
- Electric Fence Charger (this can be solar charger)
- Ground Rods
- Any additional items needed per fence type chosen
Keep in mind that these materials depend on the type of fencing chosen, and whether or not you are building on an already existing fence. This being said, these items are necessary to construct a successful electric fence from scratch. Once you’ve gathered your materials, it’s time to prepare your land for this development.
If possible, avoid rocky and rough terrain for the location of your fencing to make not only its development easier but also the overall effectiveness. Map out the area in which you plan to build your electric fence. This organizational process is crucial to ensure your fence’s efficiency.
Consider where your boundary lines need to meet for the necessary spacing for your goats. For example, dairy goats typically need more space than meat goats, so this could alter your confinement area size. Now, continue mapping out your plan. Mark your overall fence lines, lanes, corners, gates, and overall any necessary fence elements that need to be mapped out for construction.

And now the building begins.
For efficiency purposes, I’m describing how to construct a permanent electric fence that is lasting and durable. For this fence, it’s best to concrete the end and/or corner posts into the ground for max sturdiness and strength. Steel, aluminum, and high-tensile wire are also better conductors over longer distances, so consider utilizing these. Polywire strands can also be useful, though, because they are more visible to livestock. However, polywire is not great for your perimeter horizontal wires. It is less effective of a shock than high tensile electric fence wire (galvanized steel wire).
Once fence lines are established, level these areas and replace vegetation to prevent weed growth and erosion. Set end, corner, and gate post braces. Be sure to use pressure treated posts if you’re not using steel or fiberglass posts. Ensure concrete footings for corner and end posts are bell-shaped. Then assemble the brace cable starting at the bottom of all end, corner, and gate posts, then to the top of the post if the top member is horizontal. Corner braces can vary (N-brace, H-brace, or brace with wood post at the top), but a proven durable design is a corner brace with two H-braces back to back, two horizontal braces, three vertical posts, and bracing wire used.
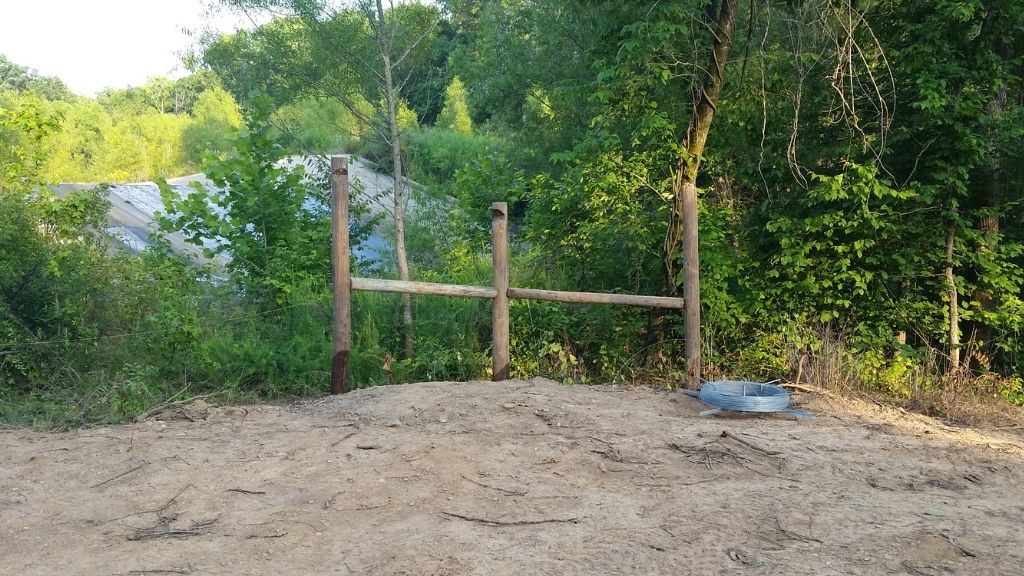
I have also sank steel posts (or fiberglass posts) 3-5 feet in the ground with no brace whatsoever. This is especially effective when your ground is rocky and digging is a nuisance.

Fence posts can be spaced up to 60 feet apart as long as your strands of hot wires have significant tension. This is another beauty in electric fencing. Your fence line posts don’t have to be 8-12 feet apart like with a barbed wire fence. Imagine the cost savings on fence posts versus a barbed-wire fence.
Once these are established, you can attach the fence wires. The bottom wire should be attached from 8-10 inches off the ground, continuing up the posts depending on how many strands of wire you want. Strands typically remain around a total of four, but some prefer five or six depending on high-traffic areas. I have always gone with 5 strands. The bottom 3 are low and close together for extra security from vermin, stray dogs, and to prevent small farm animals from escaping. The top 2 are spaced more apart for taller livestock. Good perimeter fencing is vital to a headache-free farm.

Congratulations, now you have your fence!
However, with great power comes great responsibility. Although high-tensile electric fences are sturdy and durable, regular inspections are necessary for maintaining effective electric fencing systems. Always keep the fence line trimmed. I’m not a fan of spraying herbicides on the ground, it will clear weeds from the fence lines, or you can remove them manually with a good weed eater.
We purchased a Stihl weed eater with a blade to help with underbrush and sapling growth. It was worth the money to keep our fence line clean. Your livestock will not eat the forage that’s right at the fence for fear of getting shocked. It’s a good idea to trim your fence lines every couple years.
Overall, it’s important to ensure the smooth wire fence maintains the right tension and that the fence lines are well trimmed to prevent grounding. This type of grounding is different than the grounding that comes from your ground rods. This type of grounding will cause your electric fence to have less shock when an animal comes in contact with it.

FENCING TIPS
Ground rod placement is the most important step in this entire electric fencing solution. You can have the best fencing, but if you don’t have a good ground system for your fence charger then you won’t have a good shock in your electric fence.
Your ground rods should be placed in an area with moist ground. Below a pond bank, or in constant shade. Pine trees suck the moisture from the ground so don’t drive ground rods in their area.
The number of ground rods needed is determined by the number of joules your electric fence charger has. You need 3 feet of ground rod, in the ground, for every 1 joule. Ground rods should be 10 feet away from your fence charge and multiple ground rods should also be spaced 10 feet apart. Connect them with high tensile smooth wire or the same wire you’re using for your perimeter fence. You can do the same to connect the positive to the fence making it hot.
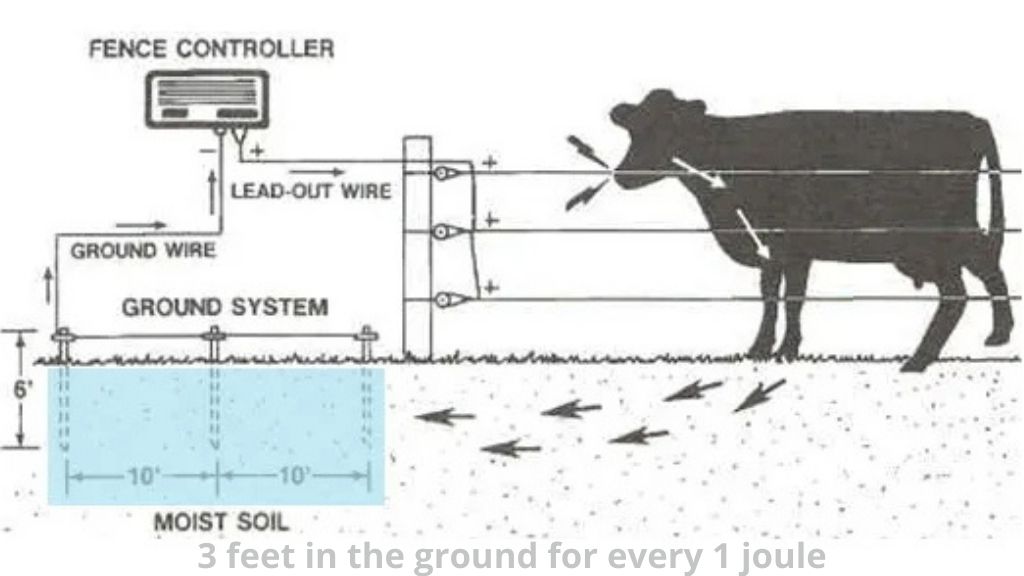
If you’re using solar power for your fence charger, be sure it gets plenty of sunlight. You may have to place your solar fence charger hundreds of feet from your ground rods and maybe even form your actual fence, it doesn’t matter. Solar power needs ample sunlight.
Turn your fence charger on. You can test it by touching it or, using plyers, you can touch a piece of wire to the actual ground (dirt) and to a hot wire. It’ll pop or spark if it’s working.
Two things I recommend you have now that you’ve build your electric fence: lineman’s pliers and a Speedrite Fault Finder. The pliers allow you to cross the fence without shutting it off, and the fault finder tells you how hot your fence is and if there are any grounding issues.
Having built your electric fence, your goats can now roam freely without you worrying about their escape or safety. Electric fencing has proven its efficiency through cost, durability, and overall effectiveness in preventing the escape of your goats while ensuring their safety.
Click here to read about how where, when, and how to sell meat goats