Whether you’ve done this a few times or you are just starting out, I’ve created this detailed guide for everything you need to know about beef briskets, including what they are, how to smoke them, how to use a seasoning, etc. Here are the areas I’ll be covering:
- What is a brisket?
- Types of cooking equipment
- Materials needed
- Cooking directions
- General mistakes to avoid
Before we begin, it is important to consider the aspects that will affect the process of cooking your brisket. These are some of the factors that determine how long you will cook a brisket. We’ll go into more detail for each of them later on in the guide.
- Size of the brisket
- Other aspects of the brisket like thickness, fat, grade
- Temperature you are cooking at
- Outdoor temperature/Environmental conditions
- Whether you wrap the brisket in foil or butcher paper
- Type of cooking device (electric smoker, pellet grill, oven, charcoal, etc.)
WHAT IS A BRISKET?
A beef brisket is a cut of beef that comes from the lower breast of a cow, making it a tough cut of meat consisting of many muscles and connective tissues. There are different components of a beef brisket that are useful to understand.

The point cut of a brisket, known as the second cut, is the fatty component.
The deckle is the thick band of fat you see on the meat, which can be cut out. You can do this by slightly pulling at it with your hands, following it with a knife, and trimming it off. This is done during the trimming process. You can choose to leave it, but it will most likely burn or become dark or crispy during the cooking process (see cooking directions section and trimming for more details on cutting fat).
The point is thicker because it contains two muscles and a lot of tough connective tissue. The two muscles are separated by the decals, or a thick band of fat. While the deckle is considered the fat and the muscle attaching the flat to the rib cage, the fat cap is the thickest part of the brisket.
Depending on the animal and how it was butchered, the fat cap could be up to an inch thick, maybe more. This portion will most likely get shaved down in the trimming process. We will go into more detail about this later.
The brisket flat (or first cut), on the other hand, is the leaner cut of the meat. It lacks marbling and intramuscular fat compared to the point, as well as resilience in cooking. It tends to burn more easily. The lean part of the meat is situated over the rib cage of the cow while the fattier part (the point) goes up toward the collar bone.

When choosing your brisket, you will typically want to go for a whole brisket. If you only want half, you could choose a flat or point cut and still produce a tender and flavorful brisket. Be on the lookout for a thick flat if it’s the half brisket that you decide on. Consider this for a whole brisket too, as well as marbling on the side of the meat to produce a well-cooked brisket.
A full packer brisket is a whole brisket, usually a large brisket, which includes both point and flat sections and can weigh anywhere from 8 to 12 pounds, sometimes more. You can typically buy a packer cut from the grocery store. While, as previously mentioned, you can also buy briskets consisting of just the brisket flat or just the point.
Keep in mind that the flat is more challenging to cook. It is often better to purchase a brisket with both, but you can still cook an effective brisket with only a half.
When you’re making the purchase, the general rule of thumb is to go bigger than you think. Getting the full packer brisket, the fat cap and point, is a great choice, but also look for pounds.
Your beef brisket is going to shrink in the cooking process. Let’s say you get a 12 pound cut; you can lose a couple pounds while trimming the fat down, and then a couple more during the cooking process.
So what was originally a 12 pound brisket is now an 8 pound brisket, or maybe even 6 pounds. A 10 pound brisket would then be around a 6 pound brisket, after cooking. Keep this in mind while shopping for a beef brisket that works best for you.
Now let’s look at types of cooking equipment you can use to cook the finest brisket.
TYPES OF COOKING EQUIPMENT
We will discuss 3 types of equipment for cooking your brisket: the smoker, the basic BBQ grill, and the oven.
SMOKERS
Smokers are great for cooking delicious, tender briskets, and it provides a smoke flavor that other types of cooking equipment simply can not replicate.
There are various types of smokers, and each have different price ranges.
Smokers produce smoke obviously, but also carbon monoxide, making them for outdoor use only. While necessary to use outdoors, though, it’s recommended that with this investment, you continue to treat the appliance with care.
It’s important to protect the smoker by using it in a shelter and open space for smoking but also storing it in a garage or protected area to prevent constant exposure to the elements that could harm it.
With this being said, let’s get into the different types of smokers you may decide to purchase.
Electric Smokers:
These smokers are easy and convenient. You don’t have to worry about charcoal, using a propane tank, or having to clean up a big mess after smoking. All you have to do is set the temperature for a slow cook, set a cook time, and wait while the hard work is done for you.
An electric smoker uses a heating element to produce heat while the smoke comes from wood chips, or even pellets. Your smoke source is suspended above the heating element.

Most electric smokers are developed vertically with the element at the bottom, and the wood and water pans are between it and the food racks.
Water in the pan creates water vapor, which enhances the smoke flavor and creates an indirect cooking environment while keeping temperature and smoking time low and slow.
The pros of utilizing an electric smoker is that they are easy to use and great for beginner smokers. They do not require an additional fuel source like gas, pellets, or charcoal. They have a consistent temperature and do not run out of fuel. It cuts down on costs and supplies without the additional fuel source. However, even electricity isn’t free.
Cons might be that the flavor of the meat isn’t as strong compared to other types of smokers, and the taste will be different. The brisket also will not form a smoke ring due to lack of combustion gasses. Also, the moist atmosphere inside the smoker makes it hard to get a crisp crust on some of the meat skin.
This is a problem I have when smoking whole chickens in my Masterbuilt electric smoker.
If you decide to go with this option, there are a few specific electric smokers you can consider purchasing. Here are a couple of the best reviewed options:
The Masterbuilt Digital Electric Smoker is thought to be very easy to use and great for starting out. It has a built-in digital control panel to set internal temperature up to 275 degrees and control cook time, an integrated thermostat, a 800-watt heating element, and a better-insulated, convenient wood chip tray system.

However, the wood chip tray is smaller and you might need to refill it. It also has a narrow width, so bigger meats like a 16-pound brisket, or even a 12-pound brisket will be challenging to fit without cutting or rolling.
This is the smoker I’ve used. An 8 lb brisket is really pushing it with its size.
I never add wood chips or pellets once I’ve started the smoking process. I’ve found that the handful I use to start with gives it all the smoke flavor and color it needs.
The Char-Broil Deluxe Digital Electric Smoker has four cooking racks, a remote control to view and adjust temperature and turn smoker on and off, you can control the internal temperature and cooking time with a digital control panel, and a glass door to see all racks.
It is easy to use and clean up and can fit a lot of meat. However, it does have a limited remote control range, so depending on the setup and distance you have between you and the smoker, it may not work. You also have to set either the target meat temperature or a time; you can’t just set it up to run indefinitely.
Propane/Gas Smokers:
These smokers utilize propane or natural gas to produce heat for cooking. You may use a direct natural gas hookup at home, or propane from refillable bottles. These can be found at gas stations and outdoor stores. Some Home Depot stores have self-service exchanges outside their stores.

Most propane and gas smokers have a built-in cabinet-style with a burner and vents located at the bottom, while the chimney and dampers are at the top. These do not naturally produce smoke (like electric smokers), so wood chips or pellets are used to create the appropriate smoke flavor.
The pros of using these smokers are that they’re simple to use, propane is a widely available fuel source, the heat is easy to control, and it is easier to alter the temperature compared to charcoal or pellet burners.
These are also great for time because they can be started much faster, going from cold to cooking in about 15 minutes. Propane and gas smokers also typically produce more flavor than electric grills, and they can be very affordable and hold more meat at one time.
Cons may include needing multiple gas bottles to ensure you don’t run out of gas. Some people will complain that everything cooked on this type of smoker tends to taste the same, and that it’s not as good as briskets smoked on other types.
Here are the best reviewed options for propane smokers:
The Masterbuilt MPS ThermoTemp XL features a thermostat mounted on the back of it to allow for better and more stable temperatures, or better thermostatic control for accurate temperatures. It has a LP gas tank connector and fuel gauge to ensure you know your propane level while cooking, a 2-door access (so you can get to the chip tray without interfering with cooking food), and it is easy to refill.

However, there is a short warranty period of one year and there may also be some minor quality issues with some models.
The Camp Chef Smoke Vault is very straightforward and easy to set up, and it has seemingly low propane use. You may get hours of smoking even on a low tank. However, the door typically can be seen leaking smoke, which can be common for smokers around this price. If a more sealed construction is preferred, this would not be your best bet.
The Cuisinart COS-244 is very affordable with an easy assembly. It features two doors that have tighter seals. It also has a three year warranty. However, the water and trip tray design may cause issues with blocking oxygen and heat from rising, which can negatively impact the cooking process.
If you want enhanced flavor in the meats you cook without nearly as much cleanup as associated with charcoal and pellet smokers, then this is the best option for you. These would also be best suitable for camping and cookouts considering how portable and light they are.
Pellet Smokers:
This type of smoker is essentially a combination of an oven and a smoker. They provide extra smoke flavor with the convenience of an electric smoker. It can also be used as an oven or grill, not just a smoker.

The pellets sit in the side of the smoker and are fed into a firebox, where they combust and create smoke and heat in the cooking chamber. You can use the built-in thermometers to keep the temperature stable. You can also change the airflow and the amount of pellets being fed into the firebox to create heat consistency.
The pros of having a pellet smoker include having a better flavor of actual wood smoke, they are more versatile, and the pellets burn down to nearly nothing. There isn’t much cleanup beyond emptying the firebox and cleaning racks.
Cons may be that this is not the cheapest option; it is likely at least $400 for an entry-level smoker of this type with good quality. The heating rod also runs on electricity, so you would need an electrical outlet close by.
Finally, wood pellets aren’t as easy to obtain compared to charcoal or gas, so you would need to stockpile.
Here are some of the best reviewed options for pellet smokers:
The Camp Chef Woodwind WiFi is an efficient mid-sized smoker, powered by Gen 2 digital PID controller to dial desired level of smoke. The slide and grill feature also permits you to pull a handle and switch to direct flame grilling.
Overall, the smoker is simple to operate with digital controls. The smoke adjustment controls can be set with levels ranging from 1 to 10, and it provides a nice smoke flavor that can be subtle or heavy.
However, there is no cabinet door but rather a small storage shelf, which is not as useful to keep bags of pellets or tools. While the WiFi and Bluetooth connection to your phone is useful for changing temps, adjusting smoke level, monitor probes, and turning it off, it can randomly lose connection, which can be frustrating when you spend time and money to get this far in the cooking process.
The Pit Boss PBV3P1 Vertical Pellet Smoker is one of the best when it comes to vertical pellet smokers. It holds a ton of food, and the vertical setup makes everything easy to access. With maximum space and minimal footprint, this is a great choice for a pellet smoker.

It’s typically affordable, and it even comes with a lengthy 5-year warranty. However, these smokers are not necessarily the greatest build on the market. There can be some better options, but when it comes to value for money, it’s still a winner.
Offset Smokers:
These smokers tend to be big, bulky, and spacious. The firebox is “offset” to the side and below the main cooking chamber, where wood or charcoal is burned inside and the smoke and heat are then drawn into the cooking chamber and out through the chimney.
You may need some more patience and practice to utilize this one with efficiency, but it is well worth the time and dedication if you commit to it. The flavor is rewarding if you want that smoke taste.
Pros of utilizing an offset smoker including being able to cook an abundance of food. You can also add more fuel to the fire without letting out heat and smoke since the firebox is separate.
The main drawback may be that starting it up is a longer process; it can take around an hour to get it up to the right temperature for cooking. It takes time and a lot of effort, so you would need practice to learn how to use it properly because it’s not as simple as an electric smoker.
Some of the best reviewed options for these smokers include:
The Oklahoma Joe’s Highland Reverse Flow Smoker is a good quality smoker with heavy-gauge steel. It has a heat distribution that is even and consistent across the cooking chamber, as well as a firebox that can double as a grill or warming rack.

It is also pretty easy to move. However, it can tend to leak (but easy to fix if you use a sealant), and the food closest to the firebox typically gets cooked faster due to radiant heat, so the distribution isn’t always perfect. Be sure the flat is facing away from the firebox. The flat is thinner and might overcook if closest to the heat source.
The Yoder Wichita Loaded is a great quality smoker in general. It has a slide-out rack and can be removed for bigger meats, and consistently has an even temperature throughout.
The Meadow Creek SQ 36 is a more affordable option, and it is also customizable; you can add a second tier grate or rib rack, or add a charcoal pan to convert the cooking area into a charcoal grill.
However, it does tend to have expensive shipping and a slow delivery rate with a 4 to 8 week lead time while they build the smoker.
Charcoal Smokers:
These smokers come in many shapes and sizes. They are considered to be an equal match for wood pellets in flavor from the fueling. However, they can be more labor-intensive than other types of smokers.

Compared to gas and electric smokers, charcoal smokers require more of your time and effort to set-up, clean, and overall care.
In this case, the charcoal provides heat for the smoker, and additional smoke can be produced by using wood chips, which may be set above the charcoal to smolder.
Controlling the flow of air and smoke is essential in properly handling this smoker; the amount of heat produced is determined by the air intakes near the coals. The more air that’s allowed into the firebox, the hotter the charcoal will burn.
The food is suspended above the coals and draws in heat and smoke through the chimney and also through the air dampers at the top. With too much air, the food will be dry and tough, and with too little air, the smoke and ash will make the food bitter.
Charcoal smokers are considered one of the best for getting a deep smoke flavor in your meats. The charcoal adds to the overall taste of the food, and there is also a broad range of styles and sizes to meet your own needs.
Cons can include that they need a lot of maintenance and more practice compared to other smokers. You would need to light the charcoal and give it time to ash over before adding it to the smoker –– this will take some time before it’s ready to start smoking. The ash produced from the charcoal can also create a mess needing to be cleaned up once done with smoking, which can be annoying.
For charcoal smokers, some of the best reviewed options are:
The Weber Smokey Mountain is one of the best in quality and affordability. Bullet and water smokers are the most popular type of charcoal smokers, and this is one of the finest. This Weber is made up of three sections: the lower section with a charcoal ring and three adjustable vents to control airflow and smoker temperature; the middle with the water pan, two cooking grates, and access for for adding charcoal and/or wood, and the dome lid with a built-in thermometer.

The body of the smoker consists of long-lasting porcelain, a nice chrome coating, and durable legs. It is also simple to use, lasts a long time, and you can even leave the meat going on accident without any problems with temperature fluctuations considering it holds steady temperatures for hours.
It may have a small footprint, but it still has great cooking capacity. However, it does have a cheaper aluminum door that tends to leak, especially starting out before the build up from smoking forms a natural seal.
The Pit Barrel Cooker is considered one of the best drum smokers. Instead of placing your meat on grill racks, you hang the meat vertically inside the cooker. It’s reasonably priced with an efficient performance, handling high temperatures while allowing cooler external temperatures to produce condensation in the barrel for added moisture.

The cylindrical shape permits convection heat to be distributed evenly, and the unique and efficient meat hook system with vertical cooking allows for more space. Gravity helps baste the meat with its own juices and creates “smoke fog” so a water pan isn’t needed.
It is less of a messy cleanup since the meat juices fall directly on the hot coals. However, this smoker compares in price with the Smokey Mountain (unless you decide to construct a DIY drum smoker), which arguably has a better temperature control. It can also run hot, so you have to be careful not to add too much charcoal at the start of smoking. This will ensure you maintain a low and slow temperature.
The Dyna-Glo Vertical Charcoal Smoker is more affordable, and is one of the best charcoal cabinet smokers. There is easy access to meat and to all four of its racks. The assembly is straightforward, and the smoker stays sturdy and durable.
There are many temperature control options; you can control it by adjusting the side dampers, which may take some practice to master.
One drawback is that smoke tends to leak from this smoker, and the wood chip box appears cheaply made.
If choosing to utilize this smoker, you must be serious about smoking food and willing to put in the time, effort, and patience to take care of it while cooking properly. It will take more practice to get consistent and efficient results, but in the end, it’s totally worth it.
To determine what type of smoker to buy, you should consider some factors if this is the best choice for you. Think about your budget, what fuel source you prefer to use and can afford, the number of people you desire to cook for to determine size, and whether or not you prefer it to be more portable, compact, easier to use, etc. This will allow you to choose from the many smoker options available and ensure you meet your wants and needs. If none of these are right for you, don’t worry, there are still many options open for how you may effectively cook your brisket.
GRILLS
Whether you don’t have access to a smoker or you don’t want the smoke flavor that a smoker provides then a grill is the way for you. You can still produce a great brisket using a grill, so let’s check out a couple types of grills you may choose to use if this is the best option for you.
Pellet Grills:
Like the pellet smokers previously discussed, these grills are still fueled by pellets from different wood sources, which are dispensed throughout the process to provide a continuous source of heat and smoke. The pellet grill and smoker are often used synonymously, but there are some differences.
These grills differ from pellet smokers in that they use more heat than smoke and tend to cook faster than pellet smokers. They are great for when you want to sear and barbecue, and in the case of a brisket specifically, they are effective –– they just won’t produce a smokier meat. However, thanks to the pellets, you can still achieve some of the same form of flavor and texture that comes from the burning wood.
While the pellet smoker also has a heat source at the base of a vertical design, these grills have the wood pellets much closer to the food, hence the quicker cooking. The grill has a horizontal design in which you lay the meat out at one level over the heat.
These are a couple of pellet grills that you may consider:
The Traeger Pro 575 or 780 is one of best selling pellet grills. It is reliable and operates at precise temperatures, and it is typically cheaper than Camp Chef. It comes with WiFi for remote control and monitoring, as well as an accurate D2 PID controller for a variable speed fan to hold exact temperatures.

The technology is generally more efficient and useful, and you can even choose from pre-programmed recipes.
However, the necessary accessories cost extra money, such as the grill cover and folding shelf, but some companies may include these for free.
The Z Grills 700D4E is one of the cheapest options while still being efficient. It’s an overall good value for the lower price, and it has the digital temperature and pellet control, as well as stable temperatures. It is also stainless steel and has a handy trap door for easily removing unused pellets or changing out pellet flavors.
Some equipment can double as grills and smokers, so if you want the best of both worlds, consider these too.
Charcoal Grills:
Similar to the concept of pellet grills versus pellet smokers. The primary distinction between the charcoal smoker and grill is that a smoker contains fire in a separate space with heat low enough to cook the meat at lower temperatures, while the grill is designed to cook hotter and faster by keeping the heat in an open space directly under the food.
A typical charcoal grill has the potential to do both if you keep the fire small and to one side (known as indirect grilling). This way allows for low temperatures like that of a smoker.
If you decide to use a charcoal grill, you can treat it like a smoker. Remove the cooking grate from the grill and build a fire on one side of it. If there is any wind, make the fire on the windward side so the wind can blow flavorful smoke toward the food and not away. You can then place the drip pan on the opposite side of the grill. Once the coals are hot and ready, the brisket is ready to cook!
Depending on the grill, you may also need to adjust the vents to control airflow and maintain a smoking temperature range of 225 to 250 degrees to cook the meat efficiently. The time it takes to grill depends on the weight of the brisket and whether you indirectly grill the meat.
If you have the coals on the opposite side of the grill, a brisket around 5 pounds can take around 3 or 4 hours, one around 7 to 8 pounds can take around 5 hours, and one around 10 to 12 pounds can take about 8 or 9 hours.
While the meat is cooking, you will also need to keep the lid closed as much as possible, but still continuously watching the fire and temperature. It takes some extra effort doing this while also adding more charcoal to the fire periodically. It can be challenging to keep the temperature steady. Practice will help with this if you decide to use the charcoal grill.
If you are looking to purchase a charcoal grill, here are a couple of the best reviewed:
The Weber Original Kettle Premium Charcoal Grill features a classic design with an enclosed ash container and one-touch cleaning system. You can also add more coal to the fire without removing the grate. However, it does have a storage shelf that’s rather small, but this isn’t necessarily a deal breaker.

The Char-Griller Super Pro Black Barrel Charcoal Grill is very sturdy but also easy to move around. It is easy to assemble overall, and its shelves offer extra storage space compared to other grills. It is equipped with a warming rack and more cooking space. However, the front shelf is only wide enough for storing small items and utensils.
OVEN
When you don’t have access to a smoker or grill, or you simply don’t feel like using one, an oven-roasted brisket may be the way to go. While there may be some disadvantages, an oven can still produce a tasty brisket for you and your family and friends.
Plus, almost everyone has an oven. No need to run out and purchase a smoker or a grill. Utilize what you have.
If you’re a fan of wrapping your meats in foil, then this is another reason why the over a great option for you. Consider wrapping your brisket in a non-stick foil to prevent flavors from sticking to the foil rather than the meat. Having foil around the meat ensures protection for the brisket and allows for the seasoning used to stay on as well.
This method is not the way to go if you want a smoke flavor, pink smoke rings, and perfectly moist and tender beef considering the lack of smoke that ovens provide. This method is effective enough, though, if you want a much easier and faster way of cooking your brisket. With a 6 pound brisket, you can have it cooked within 6 hours at 250 degrees, but the bigger you go with the meat, the longer it will take to cook.
If you want to obtain some form of smoke flavor, you can add water into the bottom of a large roasting pan with a rack and add liquid smoke of any variety, then lay the brisket on the wire roasting rack to cook. You can also wrap the brisket in foil if you are unable to use a water drip pan. This will act as a water drip pan, and the steam from the liquid smoke will add some extra flavor. It will not be the same, but it’s still good.

Using an oven is easy, fast, and simple to clean up compared to other methods of cooking briskets. If you are seeking these aspects of cooking without a smoker, then this may be for you. Keep in mind that you won’t get the same flavor and quality you get when actually smoking a brisket.
Now that you have an idea of what equipment you can use to cook the best brisket, let’s look at the materials you may need to effectively cook one.

MATERIALS NEEDED FOR SMOKING YOUR BRISKET
The materials you need to cook your brisket can differ based on your individual preferences, as well as the cooking equipment you choose to utilize. These are tools and materials that can be beneficial to you in the preparation and cooking or smoking processes, along with adding the final touches when working with a brisket.
FUEL SOURCE
Depending on what cooking method you utilize, you will need the necessary fuel sources to power that equipment. Be sure to invest in charcoal, wood, propane, or whatever is necessary for cooking, and have enough on hand to not run out midstream.
KNIVES
There are two knives that would be great to have when cooking a brisket. The first is a trimming knife, which tends to be smaller and incredibly sharp to assist you in trimming off the fat of the meat. The second is a meat carving knife, which should be at least 10 inches long, to help you slice the meat properly when it is officially done cooking.

A meat injector is not needed but can be beneficial to easily and effectively add moisture and flavor to your brisket. This is especially helpful if you are using a marinade for the meat.
I’m more into dry-brining, so I have no use for a meat injector. The dry-brining process allows the meat to absorb the flavor of the spices I’m using.
An instant-read thermometer can help you quickly and easily check the temperature of your brisket throughout the cooking process and during its resting time.

In order to wrap the meat properly, you may want to invest in some aluminum foil or butcher paper. There is quite the debate over which of these is more efficient in handling a brisket, but both get the job done, so the choice is yours.
ALUMINUM FOIL OR BUTCHER PAPER
Aluminum foil is effective, but keep in mind that having the brisket wrapped in foil will cause the production of steam, which can ultimately soften the bark on the meat.
Many professionals prefer pink butcher paper over anything else. If you are seeking a nice bark, butcher paper is the way to go. This paper needs to be unwaxed in order to work properly
I used aluminum foil when I first started smoking briskets. I didn’t realize that my brisket was essentially encapsulated by the foil, and affect the bark that I was looking to acquire.
If you like to spritz your brisket a few times while it is cooking, you’ll need a proper bottle and apple cider vinegar or apple juice to do this effectively. The vinegar and apple juice are both popular choices for spraying the meat. Spraying the brisket is optional, but it is a great way to add moisture.

The final items you will need are spices or some sort of seasoning to add extra flavor to the brisket. These spices can range from simple black pepper and salt to more intricate recipes like a seasoning rub. The spices will vary based on your personal preferences, but some frequently used spices may include paprika, onion powder, garlic powder, black pepper, salt, chili powder, brown sugar, etc.
I use a custom mix of seasoning that is 80% kosher salt.
Now we can move on to cooking directions for how to effectively produce a brisket of fine quality.
COOKING DIRECTIONS FOR SMOKING YOUR BRISKET
Here we will talk about preparing the brisket, the smoking process, the rest period before eating, and reheating after the rest period.
PREPARATIONS
Before you officially start cooking your brisket, you first must begin by trimming off necessary fat from the meat to ensure it cooks properly.
Any huge chunk of fat should be trimmed if it won’t add flavor or won’t render out effectively. It can take quite a bit of time trimming silver skin off, but taking the time to do so is worth the effort. You can choose how much you trim, just make sure you trim the excess fat but also keep some to allow the meat to stay tender and moist.
Place the fat side up in your smoker. This allows the fat to render down over the meat.
Also be sure to purchase a good trimming knife that allows you to properly cut and trim the meat. It needs to be sharp and overall feel good and natural to hold in your hand. Boning knives are highly recommended for this type of cutting.
A dull knife will not only be irritating but it will cause you to leave more fat than needed.
I use victorinox knives, like the red handled knives shown above in the Materials Needed section.
You can split up the lean and fatty parts if you’d like, or you can leave the brisket whole and just cut off the excessive fat areas.
It is necessary to trim this fat off so it doesn’t end up too fatty after cooking, but you also don’t want to trim too much because then the meat will run out of fat and be too dry. Aim for around a quarter-inch left on the brisket, but this can also change depending on the cooker and how you’re cooking it.
Side note – keep in mind that briskets are easier to cut when cold. The meat is not as soft and allows for a smoother cut. It’s harder to cut through after sitting out and warming, also increasing the risk of cutting yourself.
Next, you may consider brining your brisket.
Brining, my personal favorite, is an excellent way of ensuring the meat will be loaded with moisture, tenderness, and flavor. The solution, mostly composed of salt with 20% pepper, can be applied to the brisket as a wet brine, dry brine, or through injection. Regardless of the method utilized, brining the brisket prior to cooking allows the meat to retain more moisture during the extended period of cooking time.

Wet brining adds moisture. Dry brining retains the original moisture of the meat. I want the original flavor, not a watered-down flavor.
Dry brining consists of rubbing salt into the brisket prior to cooking, and this time can range anywhere from 2 to 48 hours; however, it takes a while for the salt to penetrate the meat, so dry brining as early as possible is recommended.
To dry brine your brisket, rub salt on the meat before leaving it in the refrigerator overnight. If you don’t have the time, you can do this at least 2 hours before cooking. You may also consider applying a rub at the same time you brine the meat, allowing the spices to effectively penetrate your brisket. Be careful with meat rubs that contain higher salt contents. You don’t want to overdo it. However, the chances of you overdoing it are slim when you brine for an extended period of time, like 48 hours.
Dry brining is arguably the best technique for brisket considering the cleanliness and effectiveness of it, as well as how it allows the meat to maintain its natural flavor.
The only downfall with dry brining, or any type of brining, is the amount of space it takes up in your refrigerator.
While table salt is familiar and can be used for dry brining, it isn’t recommended as the best type of salt to utilize in this case. Don’t use curing salts either; these contain preservatives that you don’t want for your brisket –– feel free to use it on your bacon, though.
Utilize something like Kosher salt, which doesn’t contain iodine, has large granules, and uses anti-caking agents to prevent the salt from clumping together.

Wet brining is the process of submerging meat in salt water with added flavors. Wet brining may be useful in some cases, but it’s not typically recommended for beef considering how the meat may lose too much flavor. The flavoring can be easily diluted when beef soaks in a wet brine solution.
Wet brines work best with poultry, pork, and corned brisket, so unless you’re cooking one of these, it’s best to go with dry brining.
For added moisture to your brisket, you can also consider injecting it with bone broth or a marinade. You can purchase a meat injector online or in store for a reasonable price; it’s easy to use and provides your meat with more moisture and extra flavor. An injector is the only way to thoroughly get flavor and moisture to the center of the meat, so buying one would be a wise and affordable purchase.

If you want to use a marinade on your brisket, likely by soaking it overnight prior to cooking, there are many recipes you can use. Spruce Eats promotes a marinade consisting of horseradish, mustard, red wine, olive oil, lemon juice, wine vinegar, salt, and onion and garlic powders, and cayenne if you’re looking for some extra spice and heat.
There are many seasonings you can apply to your briskets in general, whether you are applying them to a marinade or using them dry. Oftentimes you may combine several to create a flavorful dry rub. Regardless, you’ll want to give the meat that added flavor with some type of seasonings of your choosing.
In addition to salt, you may want to create a tasteful dry rub to apply to your brisket prior to cooking. Spices you may include in a dry rub could consist of onion powder, garlic powder, brown sugar, chili powder, black pepper, etc.
A specific recipe, promoted by Grilla Grills, for a homemade rub includes black pepper, granulated garlic, fajita seasoning, granulated onion, and Grilla Grills own citrus herb rub
You can also just keep it simple with salt and pepper; use half kosher salt and half ground black pepper. You can use a shaker or simply mix the salt and pepper in a side dish and swirl them together. Sprinkle it over the meat, constantly keeping the cup or bowl moving so the salt doesn’t settle in the bottom.
Make sure to cover the top, bottom, and sides. Keep in mind that you don’t have to be excessive with the rub. You want the flavor of the meat to come through without caking on too much seasoning and overpowering that original taste. It’s better to be conservative with it rather than applying too much. You can always add more.
COOKING
Prior to putting the meat on for cooking, you can let the brisket warm up to room temperature. You can’t do this with other meats like poultry or pork, but you can let beef warm up to allow for a more even cook. However, if you choose to put it on cold, then that’s okay too.
In general, a good rule of thumb for cooking briskets is keeping the temperature low and the time long. It’s a marathon, not a race. It’s best to smoke your brisket between 195-225 degrees Fahrenheit. Cooking at higher temperatures forces the moisture in the meat to escape, making it dry with lack of flavor. There are other cases, though, in which the meat needs to be cooked at higher temperatures, or else it would take too many hours to cook properly.
I go with a cooking temperature of 225 degrees for 18-20 hours for a 5-8 lb brisket. After 6 hours I wrap in butcher paper and place back in the smoker.

If you have a larger grill or smoker with the convection constantly cooling the meat, you would probably want to cook your brisket around 275. If you have a pellet grill then you would most likely burn the meat at 275, so you would cook it at 225 instead.
As a basic guideline, consider a small offset to need meat cooked around 250, while a big offset should be around 275. It’s not just the size of the brisket that changes things. The size of the smoker matters as well.
Ceramic cookers, pellet grills, or kettles should stay around 225. This again depends on what cooking method you decide to use.
Using various tools like a meat thermometer that continuously tracks the temperature of the smoker with one probe and the meat with another, as well as an instant-read thermometer to check different areas of the meat, may also be useful in making sure the temperature is effective throughout the cooking process.
Timing is more challenging to determine since we don’t cook briskets to time but rather internal temperature. The time it takes to cook also varies based on weight; a smaller brisket won’t take as long to cook and gives you better control of the time, but a larger brisket can take longer and needs more care and attention.
The key to finding the right temperature is understanding your cooking device and how it affects the meat at differing cook times and temperatures. This will take research and lots of practice to fully grasp and perfect your brisket cooking process.
This is an optional step, but if you want even more moisture added to your brisket, you may consider spraying it a few hours into the cooking process, and do so a few times throughout this duration. It is completely optional, but it is beneficial.
A great solution you can use is half water and half apple cider vinegar, or the combination of apple juice and water, and you can spray a generous amount of this onto the meat. Repeat this around every 45 minutes to an hour to ensure the meat does not dry out on the surface.
I never spray my brisket, and it always comes out moist. But I dry-brine for 48 hours. This helps with retaining moisture.
RESTING PERIOD
Once your brisket is removed from your smoker or other cooking equipment, it is essential to rest or hold the meat. Briskets continue to cook after being removed, so allowing the meat to rest is crucial, and by skipping this step, you risk negating all your hard work.
Allow your brisket to rest for at least 30 minutes prior to slicing, but around one hour or longer is recommended. Any less than 30 minutes causes the juices to spill out, so it’s important to let the meat reabsorb that moisture and flavor as the muscle fibers relax in this period of time.
My personal preference is 4-6 hours on the counter, and then refrigerate, all the while still in the butcher paper. I used a foodservice film to wrap over the butcher paper before placing it in the refrigerator.
While it rests, you can leave the brisket wrapped –– if you plan to use aluminum foil or paper to cook it. There are many who choose to wrap their briskets in aluminum foil or peach/pink butcher paper a while after cooking, typically after the meat reaches around 165 degrees. This allows for the internal temperature to rise faster, and it’s also the last stage in allowing fat to render out. You can choose to smoke a brisket unwrapped, but it may take a little longer. If you decide to wrap your brisket, you will want to keep it wrapped in the resting process. Keeping the meat wrapped allows it to stay warm while keeping all of the juices intact.
You want a slow cooling process. Almost room temperature before placing it in the refrigerator.
To hold the brisket, you can also wrap the meat within a towel and place it in an insulated dry cooler for up to four hours, in which the brisket will continue to cook and come out incredibly tender with lots of moisture. Keep this in mind, though –– while your brisket stays wrapped in foil or paper, it’s going to keep cooking. It’s best in this case to keep a thermometer inserted into the meat so you may track the internal temperature and make sure it doesn’t overcook.
I never use aluminum foil. That’s like wrapping it in an electric blanket. Butcher paper works best.

When you are going through the initial cooking process, you can also allow for this carryover cooking in your time calculation. You may want to cook for slightly less time so you don’t overcook the brisket.
In general, if your brisket takes around 8 to 12 hours to cook, pull the brisket and let it come down to about 180 degrees before letting it rest in a cooler. If it is any longer than 12 hours, it’s suggested that you allow it to cool to around 165 degrees before placing it in a cooler to slowly go down to around 145 degrees.
The longer the cooking takes, the more time that meat is sitting at a high temperature. You want to make sure to give it plenty of time to cool and rest after this cooking process. This makes sure moisture and flavor is distributed and equalized evenly throughout the meat.
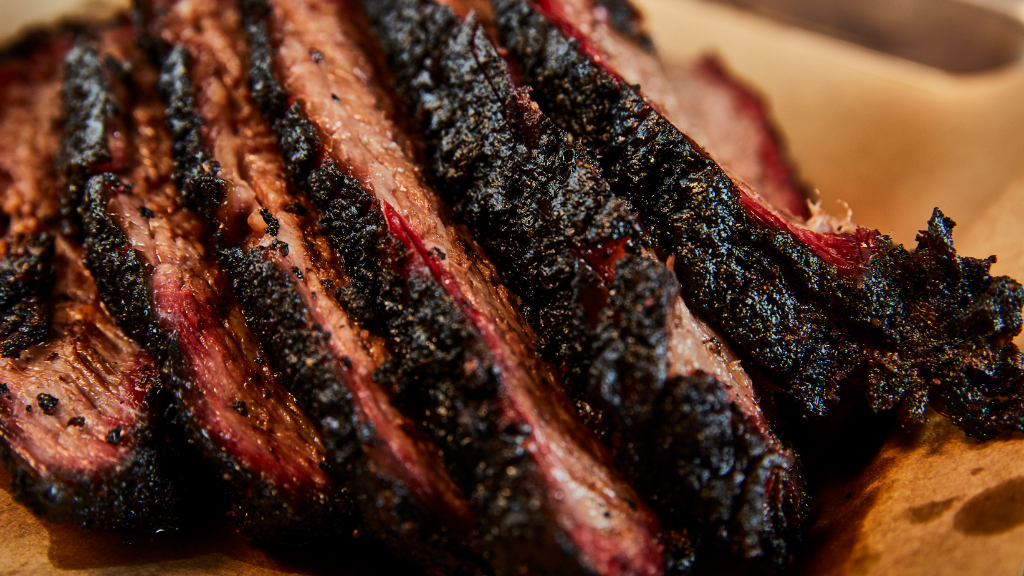
After the meat is done resting, you can begin slicing the meat. It may be best to start at the flat end of the brisket and slice your way up, then rotate the meat 90 degrees and cut it again after getting to the point and seeing the two muscles come into play.
The goal is to cut against the grain. Picture string cheese: do you want stringed meat or slices of steak?
REHEATING
Before getting to the reheating process, it’s important to know how much you intend to eat. You shouldn’t slice it all prior to its initial serving. Slicing the brisket allows for all of that moisture to escape, so it’s necessary to keep the brisket intact in larger pieces so the moisture and juices remain in the meat and ensure the best leftovers.
To store the brisket before reheating, it’s recommended that you put the meat into vacuum packaged bags. These have proven to be one of the best ways to retain moisture in the brisket. While zip-lock bags are a cheaper and a suitable alternative, it may be challenging to squeeze all of the oxygen from the bag, which can affect the brisket’s moisture level.
We always eat our brisket within a few days, so zip lock bags work fine for us.
Leftover brisket should essentially come back up to a safe serving temperature of about 140 degrees Fahrenheit. If you’re looking for simplicity, you can reheat your brisket by wrapping the leftover meat in butcher paper, and after storing, add some liquid for added moisture and to ensure it doesn’t dry out, and place the meat in the oven set to 250-325 degrees Fahrenheit, for 25 minutes.

If you decide to use the vacuum packaged bags, though, the brisket will maintain its flavor, freshness, and moisture best.
You may try the sous-vide –– literally meaning “under vacuum” –– cooking method by using the sealed bags as well. This is a French cooking method that consists of poaching vacuum-packaged food at low temperatures for a longer period of time. This is a great reheating option because this method allows the meat to retain all its natural juices in the bag it’s held in.
Regardless of whether you try this or simply wrap the brisket in butcher paper, the brisket can effectively be reheated in the oven. Simply heat the meat back up until it reaches the safe serving temperature and enjoy!
If the oven isn’t your forte, another option is to reheat the brisket on your grill or smoker. You can start with a similar process to the oven method –– wrap the brisket in foil because the flame could set the butcher paper on fire, and add beef broth to moisten it. This liquid can also be leftover meat juices or butter. Bring the temperature of your grill or smoker to 225 degrees Fahrenheit. If you are planning to use a charcoal smoker, set it up for indirect cooking.
Probe the meat, monitoring the temperature carefully throughout the reheating process, and warm it up until it reaches 160 degrees Fahrenheit. The bark on your brisket may or may not be slightly soggy at this point, so if it is, unwrap the meat from the foil and place it back on the grill directly over flame. Be careful with this because you don’t want to dry out the meat. It’s recommended to only do this for 10 minutes; any longer and you risk drying out the meat and losing too much flavor.
If you accidentally dry the brisket out after reheating, don’t worry; mistakes happen. You can always disguise the dryness of the brisket by serving it with coleslaw or turn it into a bbq sandwich with barbecue sauce. You can do this even if the meat is still moist and tender, and you’ll have a delicious meal set up.
MISTAKES TO AVOID WHEN SMOKING A BRISKET
Carefully consider what meat you buy. It makes complete sense that the lower the price of the meat, the lower the quality of brisket. The cheapest option is not always the best option. However, you don’t necessarily have to buy the finest, most expensive beef to have a good brisket; just don’t aim to get anything too low of a quality.
For the best and most successful product, you should try to at least purchase a choice brisket. This has less marbling than prime, but it is still efficient and one of the cheaper cuts you can buy. Select brisket may work, but it is more challenging to make this turn out as good as Choice or Prime briskets.

Prime is the most expensive out of the three but is also the best quality considering the extra fat and marbling. Other differing options determine the quality of meat as well, such as grass fed, USDA-rated, and American Wagyu.
Some say grass-fed beef isn’t ideal for smoking because it typically contains little intramuscular fat. USDA rated meat consists of the options previously mentioned: select, choice, or prime. Wagyu beef is some of the most expensive you can buy, but it also has great marbling and is considered the finest beef.
I smoke grass-fed beef briskets from our farm and I, along with my family, friends, and customers, love the taste.
Take your time trimming the meat properly. While some tend to trim off every bit of fat from their briskets, others fail to trim off enough. Trimming too much fat leads to the meat being overly dry, and on the other hand, trimming too little or none at all leads to parts of the brisket burning. It tends to be better to trim more fat than too little, but it’s best to find a good middle ground. Take your time trimming and cut off all excess fat that isn’t necessary for cooking your brisket.
I like to leave ¼ inch of fat wherever I can.
Know when to cook the fat side up or down. It is often best to point the fat cap toward the main source of heat, so whether you cook the fat side up or down is dependent upon what cooking equipment you decide to use.
If you are using a pellet grill or smoker like the Weber Smokey Mountain, you would cook the beef brisket fat cap down since the heat is essentially coming from below. On the other hand, if you decide to use equipment like a well-insulated offset smoker, the heat would rather come from above, so you would cook the brisket with the fat side up. Cooking fat side down is often considered better since the beef brisket typically looks and can taste better. Fate side up can prevent that nice bark from forming, but with the fat side down, the bark can form evenly, giving the brisket a better appearance.
With the fat on the bottom, the seasoning will not wash away when that fat melts (the meat can’t absorb fat, so the fat melts and runs off the meat), and the bark still retains flavors added.
The smoker produced with fat hitting the coals or other heat source also adds extra flavor. This is if the heat is coming from underneath the meat. So while it is great to cook your beef brisket with the fat side down, it would be best to cook the fat side up when the source of heat is coming from above.
I always dry brine and then cook with the fat side (fat cap) up. My seasoning is already in the meat. The fat draining over the meat helps with moisture.
Another common mistake is following instructions concerning time and temperature but not researching your cooking device. Cooking at the wrong temperature and for the wrong amount of time occurs too often.
Figuring out the right temperature for your grill, smoker, or other method of cooking will provide the best results. The cook time, as previously mentioned, also relies on other components, but the type of equipment being utilized is a major one.
When checking the temperature on your brisket, avoid taking the temperature in the fat pocket between the flat and the point. This area goes up in temperature much quicker than the surrounding meat. You should check the temperature in the middle of the flat and then the middle of the point in multiple areas.

It’s considered done when the internal temp reaches 225 degrees. Always use an instant-read thermometer.
Don’t focus solely on cook time and temperature while your brisket is cooking. Before wrapping your brisket, it is recommended that you look for five things to ensure the brisket you cook will be efficiently done.
The first is color; the color of the brisket will tell you how much smoke flavor you have put on. The darker the brisket, the more smoke flavor there is –– which is what you want. You want a good amount of this flavor.
The second thing is looking at the brisket’s bark, which is the exterior build up of the rub you use combined with the fat render and meat itself. You need to have a good exterior bark on your brisket before you can officially say it’s done.
The third thing to look out for is evaporation, or the process of the meat releasing moisture. If the brisket shrinks around 40 percent in size, then this is a good indication that your meat is done.
The fourth thing is fat render; rendered fat occurs when the fat on top of the brisket turns yellow, and when you poke it, there is no resistance or bounce back and it is soft. This is essential to ensuring the meat is cooked properly.
Finally, you can look out for, of course, the temperature. After checking the four previously listed items and making sure they are good to go, check the temperature to determine whether the meat is completely done. Be sure to check both the point and the flat and make sure the temperature is where it needs to be, typically 215-225 degrees.
All of these are essential to consider in a perfectly-cooked brisket.
Another problem that seems to occur often is applying too much seasoning. People can either use too many flavors in their rub, overpowering the meat flavor and simply combining too much spice. Even using simple seasonings like salt and pepper, they just use too much in general.
The amount of seasonings you use should be dependent on the type of smoker you’re using. If you are using a grill, oven, or cooking device that does not produce more smoke flavor compared to those big offsets like larger smokers, you may want to provide more spices and seasonings to supplement more flavor to the meat. On the other hand, a simple rub with a mixture of just salt and pepper is better.
Overall, though, it is better to keep the rub simple while finding a “happy medium” in the amount you use on the exterior of the brisket.
Dry-brining helps prevent over-seasoning. You season before allowing it to sit in the refrigerator for 2-48 hours, and then no seasoning is applied when going from the frig to the smoker.

The baking sheets allows air circulation on all sides of the meat.
If and when you are spraying your brisket, do not spray the fat. While you spray the meat to protect it, the fat does not need protecting; you want the fat to get hot and render, so spraying only hinders this more. It won’t necessarily ruin your beef if you accidentally spray the fat, but keep in mind that spraying it is simply counterproductive.
Be sure not to over smoke the brisket. If you decide to use a smoker, especially with wood, you need to fully understand the type of smoker and how much wood to apply to ensure you don’t get too much smoke flavor from cooking the meat. Too much smoke can lead to the brisket tasting bitter, and you don’t want that after all this hard work.
Depending on the smoker, you can easily over-smoke the meat, so don’t completely confide in the concept of “the more smoke the better” because there is a point where it’s just too much. You can use clues previously mentioned, like the color of the meat and the bark formation, to determine how much smoke you are putting on the brisket.
This takes practice to master. Don’t give up when your brisket doesn’t turn out like you prefer.
Also, I never add more wood or pellets after I’ve started the smoking process. I only use what I start with. Remember, I’m using an electric smoker. A smoker with a firebox is completely different.
Keep your temperature consistent. This especially applies to offset smokers, but keep in mind that temperature swings can occur. When these take place, the temperature can drop enough and cause the brisket to not cook completely and even cool off during a certain time period, which leads to the meat needing more time to cook and more work on your part. You can also end up burning parts of the meat and overall preventing consistency in the brisket –– this is essential to having a good brisket. Pay attention to your temperature.
Keeping the temperature consistent will allow you to avoid these issues and help in properly cooking your brisket. The smaller the smoker, the more challenging this may be, but if you put in the necessary work and dedication, you will have a successful brisket cooked to its finest quality.
If you wrap your brisket, ensure that whatever you are choosing to wrap it in, whether this is foil or paper, is tightly and securely wrapped around the meat. If your wrapping is not tight, you are essentially allowing the steam from the meat to escape, and that is something you don’t want to do. Rather than wrapping loosely, which often leads to a mess anyways, make the foil or paper secure around the meat to trap that steam and those juices to retain moisture and keep a great brisket.
I do not use aluminum foil. I, along with some of the top smokers, like Aaron Franklin and others, use butcher paper.

Don’t serve the meat immediately after the cooking is finished. It can be a struggle to hold back after removing your brisket from the smoker or grill. However, it needs enough time to rest for 30 minutes to one hour prior to serving.
If you have guests counting on a specific time to eat, account for a couple more hours than you think you’ll need to allow for the meat to rest properly.
Allowing the meat to rest lets the rendered fat distribute better and for the meat to retain its moisture and tenderness, as well as flavor. Some professionals allow briskets to rest up to eight hours outside the refrigerator. Essentially, the longer the better. This is why I rest mine 4-6 hours on the counter, but I’m never in a hurry to serve it.
If you mess up, the good news is you don’t have to change the entire process. Making big changes to how you cook your brisket won’t necessarily show you where you messed up. Keep practicing by making small changes with slow and steady progression to the brisket. In time you will find yourself being far more successful in obtaining a tasty juicy brisket.
CONGRATS! YOU’RE A PRO.
Throughout this guide, we have covered what a brisket is, types of cooking equipment you may utilize, the materials you need for cooking and preparing the brisket, cooking directions, and general mistakes to avoid. With all of these components of cooking a brisket taken into account, you are on your way to successfully producing the best briskets.
It may not be one specific step-by-step instruction manual, but this is because every aspect of this process is dependent upon various characteristics of your brisket and equipment being used, as well as other outside factors.
Practice makes perfect!
The size, cut, thickness, fat, and grade of your brisket, as well as the temperature during the cooking period, whether you wrap the brisket in foil or paper, and outdoor factors like temperature and humidity can impact how long you cook the brisket.
The primary dependent for all things that make up the cooking process of this meat is the cooking equipment. Whether you use a pellet smoker, oven, propane grill, electric smoker, charcoal grill, or others; each method determines how long and at what temperature you need to cook your brisket.
Also, remember that you always need to consider more than just cook time and temperature too, especially when the brisket is close to being done. Consider other aspects of the brisket, and, in general, keep in mind the common mistakes that occur and be sure to avoid them to ensure success.
Overall, there are many different methods and options for you to choose from concerning everything brisket, ranging from spices to cooking equipment to the meat itself. These choices ultimately determine how you can cook your briskets efficiently. There is a lot that goes into cooking a great brisket, and even with these choices made, it can not be done effectively without dedication and practice.
Cooking a brisket takes patience and effort, but once you have that first slice, you will know your time and work has been worth it.
Once you have a successful process of cooking briskets, you will be able to share your hard work with friends and family. I went from throwing away my first brisket to knowing I can smoke a brisket and even beef ribs that keep my farm customers coming back for more.